Taper's guide part 2: Microphones
Part 1: Your target and the recorder
Gear
Part 2: microphones
Ok, now you've got a great recorder sitting on your desk – and now what? Well, U2 record great music but we wouldn't be able to listen to it if they didn't use microphones. The microphones are the MOST IMPORTANT link of the whole recording chain in order to achieve a great sounding bootleg like Alysha's superb 2009-07-07 – Milan recording. Just like recorders, there's thousands of options out there, ranging from inexpensive handmade mics to professional mikes well worth over $1000. Many (if not most) rookie tapers wish to avoid the external microphones and just record with their fancy new recorder's internal mics, but the result is more than often a distorted and/or muddy and/or simply poor recordings. There's a reason why all of the best recordings out there are made with external microphones: because they're needed!
There's a few essential things you need to know about microphones. We won't get into any technical terms, and will restrict any explanation to what we care about: field recordings of amplified rock music.
a) Polar patterns: the mic's polar pattern (or directionality) indicates how sensitive it is to sound coming from different angles. Just as an example: if Bono sang into an omnidirectional mic, it wouldn't matter if he's facing the audience or facing Larry Mullen; if he sang into a cardioid mic, he would need to face the mic directly, or his voice would be lost as the mic wouldn't be sensitive to sound coming from other angles other than the main cardioid axis. There are many different polar patterns with different applications, pros and cons. If you wish to know more about this, there's this simple explanation on Shure's website, as well as the Wikipedia article and a more comprehensive explanation by SoundOnSound. For the time being, you just need to know that omnidirectional, cardioid and hypercardioid are the most useful (and thereby, most common) patterns for taping rock shows. Roughly speaking, the omnidirectional pattern will produce a recording that's more natural, more realistic to what you actually heard on the venue, but it will also pick up every chat, scream and clap that the audience around you (or yourself) produce; on the other hand, all kinds of cardioid patterns eliminate some part of that “surround noise” around you, and also modify to a certain degree the sound of the band. There's certain situations where a recording sounds better (or worse) than what you heard while standing or sitting at the venue, because the cardioid mics pick up a different range of sounds than your ears.
b) Termination and input: most stage microphones are terminated into XLR plugs, which most handheld recorders don't have inputs for. Unless you got one of the “big budget” recorders from our first article that might have XLR inputs, you probably need a microphone that's terminated into a standard 3.5mm jack (to make clear: the same plug as your iPod's headphones). For more advanced tapers, there's plenty of XLR>minijack, RCA>XLR, jack>minijack, etc. conversors, but for the time being, we'll just stick to 3.5mm jacks, which is the standard input on most handheld recorders. If you get the option for it, 90º angle connectors are usually preferred over 180º connectors for stealth recording, mainly because they are more resilient and less likely to snap out of the input socket while you are enjoying the show and aren't watching the recorder.
c) Power supply: quoting ourselves, many (if not most) rookie tapers that eventually accept that they need some external microphones, wish to avoid carrying a power supply, but we recommend to use it. A mic power supply is a device that feeds the microphone with enough voltage to reach its optimum dynamic range and frequency response – something that most recorders can't provide on their own. Many recorders (not all) provide something called “plug in power” through their mic-in input, a small current that ranges between 1'5 and 5 volts; nevertheless, most mics work with 7'5 – 9 volts, so the p.i.p. won't feed them properly. Will the mics work? Most of the times, yes. Will the mics produce a good recording? Many of the times, yes. Which are the pros? Not carrying another device with another cable and another set of batteries. Which are the cons? If the music you're recording reaches a certain volume (and U2 is likely to reach it, if only during Where The Streets Have No Name!), the mics won't be able to handle all the volume pressure due to the lack of voltage and the result will be a distorted recording. Also, if the band plays a quieter section (like an acoustic performance of Stuck Stay or a speech), maybe the lack of voltage will unable your mics to properly differentiate the music volume from their own and the recorder's floor noise.
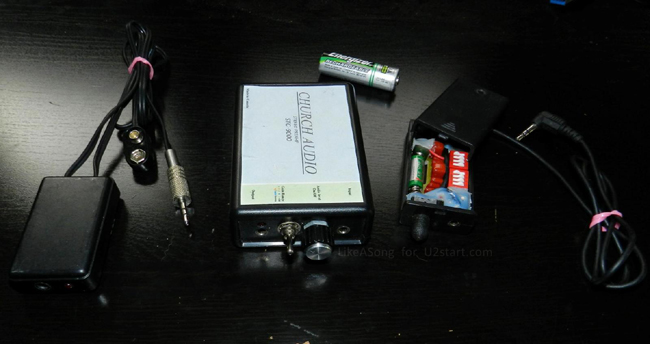
c.1) Battery boxes: these are cheap and small devices that include a battery, a few internal circuitery, and an input&output cables – that's all. Therefore, they're convenient to carry around and not really suspicious. A battery box can't amplify the sound, it just feeds the microphones with enough voltage to do their job properly. They are used for rock shows where the amplificated sound has enough volume not to need any additional gain. You can get a decent one for around $50, or just build one your own if you have minimum soldering & electronic skills.
c.2) Preamps: preamplifiers are quite bigger than battery boxes, and usually have more controls and circuitery. A preamp is able to amplify the sound you're getting from the concert's PA, which is useful for shows that just aren't as loud as a couple of Irish boys belting out Sunday Bloody Sunday. Preamps also feed the mics with their proper voltage and all, but we'd recommend to start with a battery box since they're cheaper, smaller and easier to use than preamps.
CA-9100 preamplifier besides two battery boxes
d) Location, location, location: most tapers will tell you that where you're at the venue is the most important factor to get a good sounding recording. Not all venues sound good at every spot; not all venues sound bad everywhere. With some practice, and becoming used to some venues close to you, you'll soon know where to position yourself in order to get a good recording. Being at the first row might not be a good option: the PA usually doesn't sound at full potential, and it's sometimes not as balanced as on other locations. There's the so-called "sweet spot", which is an area between the stage and the sound desk (closer to the latter) – that's usually where the venue sounds the best. For the next tour, we currently (by mid-February 2015) don't know much about the stage and venue configuration besides that it won't be very usual, but we bet the best sounding area will be around 10-12 meters away from the first row, mid-arena, facing Bono. If you're seating, the results will depend more on the venue's sound, it's more of a lottery since you can't move around. Lower seats consistently give better results, but they're also more expensive! 
Now that we have a power supply and know what to do for our mics to work great, it's just about time to choose... well, the MICS themselves. As we said earlier, there are more options out there than the times U2 have played I Will Follow, so we'll stick to a few known ones, ordered by your budget. Once again: getting the most expensive pair of mics won't get you the best sounding recording automatically; getting a much cheaper mics might result in a much better recording. Take this example: if you get your little nephew a $6500 Gibson Les Paul for Christmas, he probably won't make it sound any good until he gets older and starts practicing; if you give The Edge a $70 unknown Korean guitar, he will probably make it sound much better than your nephew ever will. Right?  Ok, so...
1) Small budget
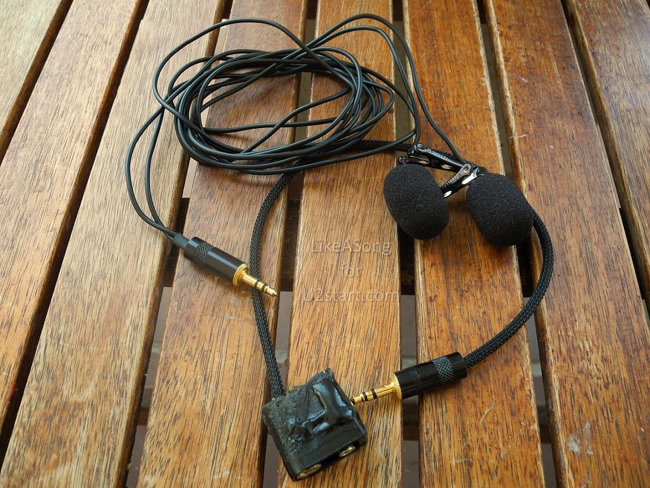
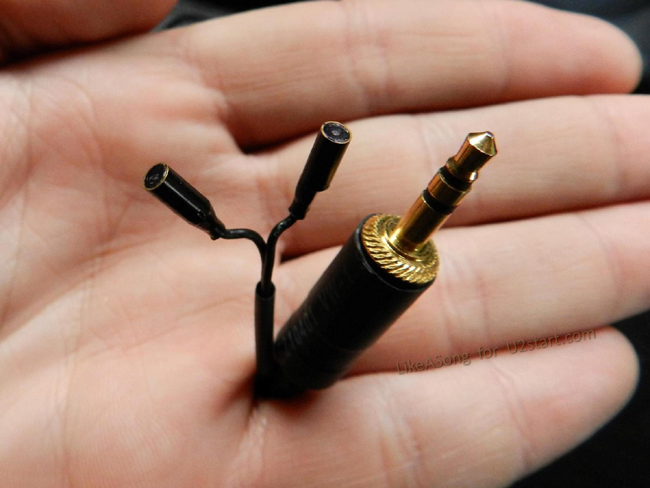
Most tapers agree that Church Audio microphones are the best among the smaller budget section. Church Audio is a guy who handmakes his mics pair per pair and customizedly ships them to his customers; that means that you often have to wait just a couple of days, but on the other hand you could wait for a month or even more, as he has hiw own work and life and that can interfere with his building times. The quality of the mics is comparable (sometimes superior, as he invented the 4.7K resistor system against distortion) to other microphones sold by commercial manufacturers, and they have produced great recordings like Melbourne 2010 and Houston 2009 (as well as many other great recordings of other artists). Church Audio usually have special sales going on, but even out of sale season, his mics and power supplies are very affordable. A pair of brand new CA-14s just like the ones Bakerstuff used for his fantastic 2011 East Rutherford recording will be around $90 plus shipping. CA also does (or did, as we think they're discontinued now) the smallest mics out there, the amazingly tiny CAFS which, we swear, produce incredible recordings for something of their size!
CA-14s
CAFS
There are, of course, other options in this price range, but nothing will come close to CA mics quality – there's a reason why hundreds of tapers use it around the world! Anyway, if you want to try, it's always a matter of taste. There are very good options for under $50 that you can even build yourself, like these pairs of microphones (they produce decent recordings and they're useful for situations where you don't want to carry your most beloved gear in order to avoid it being damaged, for example):

2) Medium budget
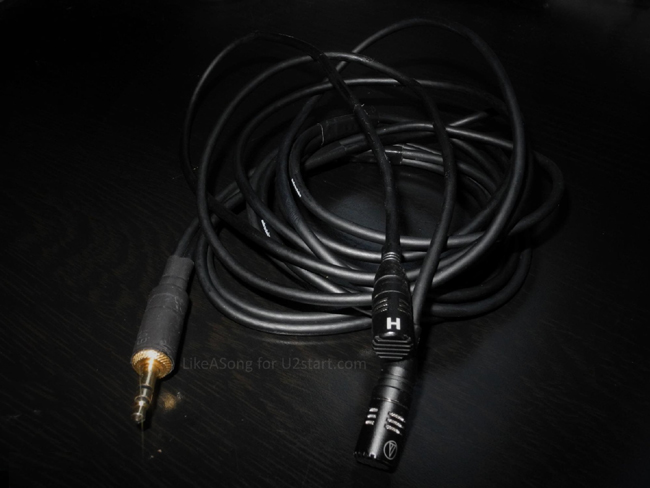
If you aren't keen on handmade mics and prefer factory made stuff, then Audio Technica microphones might suit you. AT-853s and AT-943s are good and popular options, and usually go around $200 new, although you can get them much cheaper used, as there's a strong secondary market among tapers. These mics have interchangeable capsules, so you can have omnidirectional and cardioid mics in the same pocket (an advantage above most CA mics, which have fixed capsules). Countryman B3 (these are really small!) and DPA 4061s (responsible of this London 2009 recording, for example) are another considerable options in the <$500 range, although they usually come terminated in mini-XLR, and as we said earlier, 3.5mm minijack should be your preferred option.
AT-943 (hypercardioid)
3) Big budget
Ok, so you got $1500 spare and don't know where to spend them? A pair of Neumann KM140s or Schoeps CMC6 could suit your needs. They need much more delicate handling than the previous, cheaper options, and they might sound just as good as them when recording rock shows. There have been truly excellent recordings made with expensive mics like this Munich show recorded by Alysha, but you can get almost the same quality with cheaper options that you don't need to look after so much. Of course, many audiophiles and purists will swear against this, but any honest taper will tell you that $1500 mics do *NOT* produce x10 times better recordings than $150 ones
Part 3: Get in, record and share
The article Taper's guide part 2: Microphones was published on U2start.com by LikeASong and last updated .
more originals
- article Achtung Baby, the album that changed us
- slideshow The 50 most amazing U2 shows: the 2010s
- slideshow The 50 most amazing U2 shows: the 2000s
- slideshow The 50 most amazing U2 shows: the 90s
- slideshow The 50 most amazing U2 shows: the 80s
comments
-

For questions and the discussion on this series, please visit our Taper's Guide forum thread: http://www.u2start.com/topic/10129/